The shower is one of the most dangerous places in the home for older adults. Here’s exactly how to set it up safely — every product, every modification, in the right order.
The shower is one of the most dangerous places in any home for an older adult. Wet surfaces. One-legged balance during washing movements. A hard unforgiving floor. The physical demands of getting in and out. And it happens every single day — sometimes twice — without anyone thinking twice about the risk until something goes wrong.
The good news is that shower safety is one of the most solvable problems in senior home safety. Every major risk has a specific, affordable solution. None of them require significant construction. Most can be implemented over a weekend. And the impact on daily safety is immediate and permanent.
This guide covers everything needed for a genuinely safe shower setup — in the right order, with the specific products worth buying and exactly where to put them.
Why the Shower Deserves Special Attention
Falls in the shower and during shower transitions account for a disproportionate share of serious bathroom injuries in older adults. Understanding why helps explain why each element of a safe shower setup matters.
The Entry Transition
Stepping into a shower requires transferring all body weight onto one leg while lifting the other over a threshold or into the shower space. For a younger person with full strength and balance this is unremarkable. For an older adult with any reduction in either, it’s a genuinely demanding movement that happens in the worst possible conditions — on a potentially wet surface, in a small space, often before fully alert in the morning.
This transition — in and out — is where the majority of shower-related falls occur. It’s also where the highest-impact single modification is available: a grab bar positioned exactly where a hand would reach during that transition.
Standing on a Wet Surface
Standing on one leg to wash the other, bending to reach lower legs, turning to rinse — all of these movements shift the center of gravity in ways that challenge balance even in ideal conditions. On a wet surface with reduced balance and slower corrective reflexes, each of these movements is a potential fall moment.
The Exit Transition
Stepping out of the shower onto the bathroom floor with wet feet is one of the highest-risk daily transitions — particularly when the bath mat shifts under that first wet step. A mat that moves even slightly at that moment creates a fall risk just as real as anything inside the shower.
Temperature and Scalding
For anyone with reduced sensation — common with diabetic neuropathy — or cognitive changes that affect temperature judgment, water that’s too hot presents a scalding risk that’s easy to prevent and often overlooked until it matters.
For tub entry specifically — a transfer bench is the solution most families don’t know exists. Rather than stepping over the tub wall, the person sits outside the tub and slides across to the inside position. No step-over required. Our complete guide on the Best Transfer Bench for Seniors covers who needs one, what features matter, and the specific option we recommend.
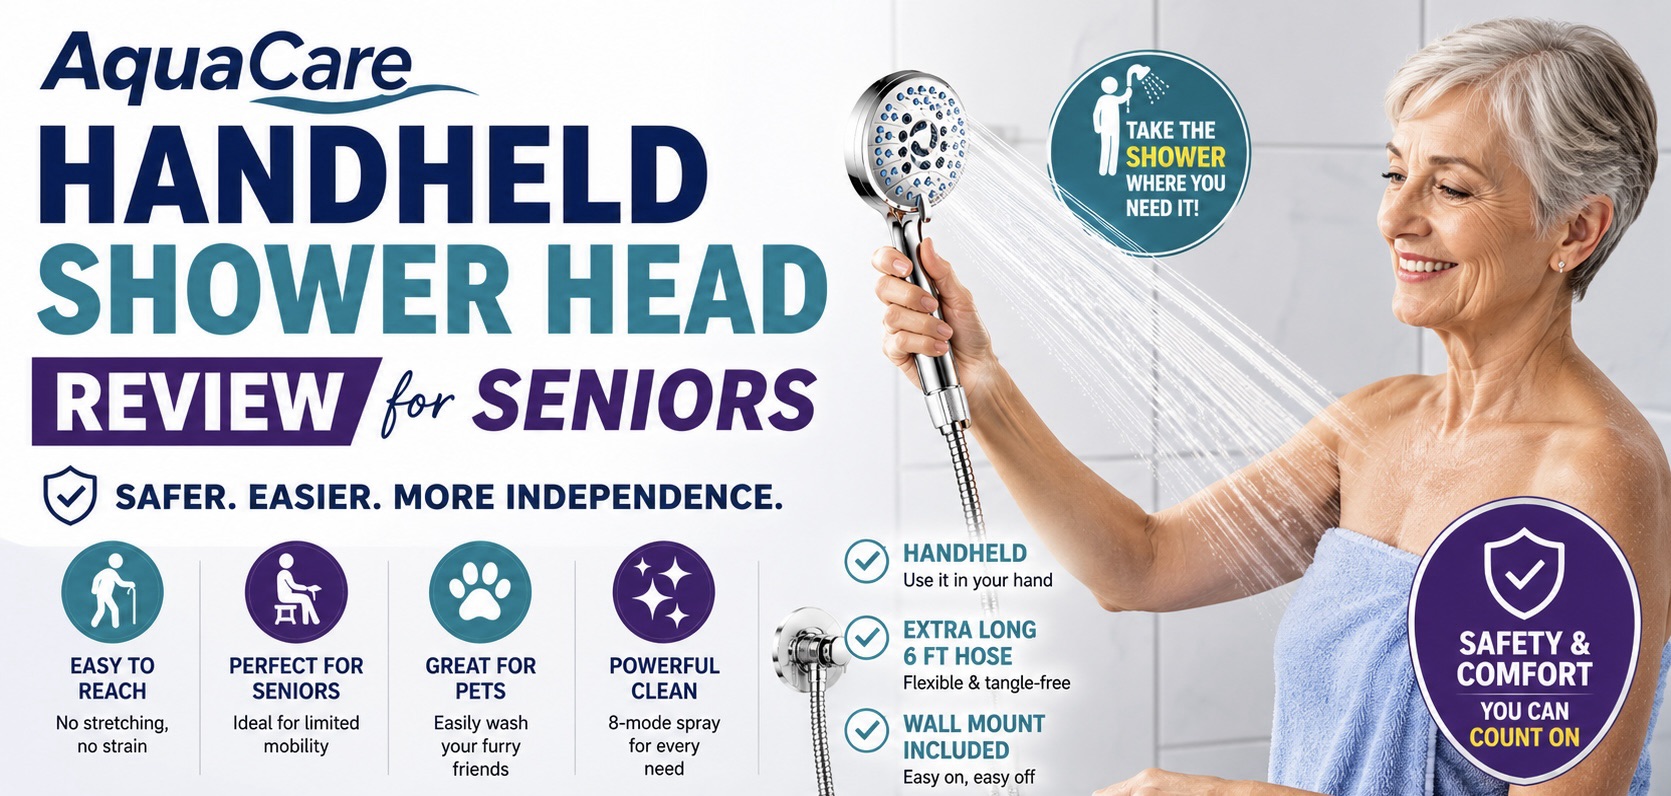
A handheld shower head makes every other shower modification more effective — directing the spray where the body is rather than requiring the body to move to the spray. For shower chair users and anyone with limited mobility it’s one of the highest impact-to-cost upgrades available. Our review of the AquaCare Handheld Shower Head covers the six-foot hose, eight spray modes, and anti-clog design that make it the top pick for senior bathrooms.
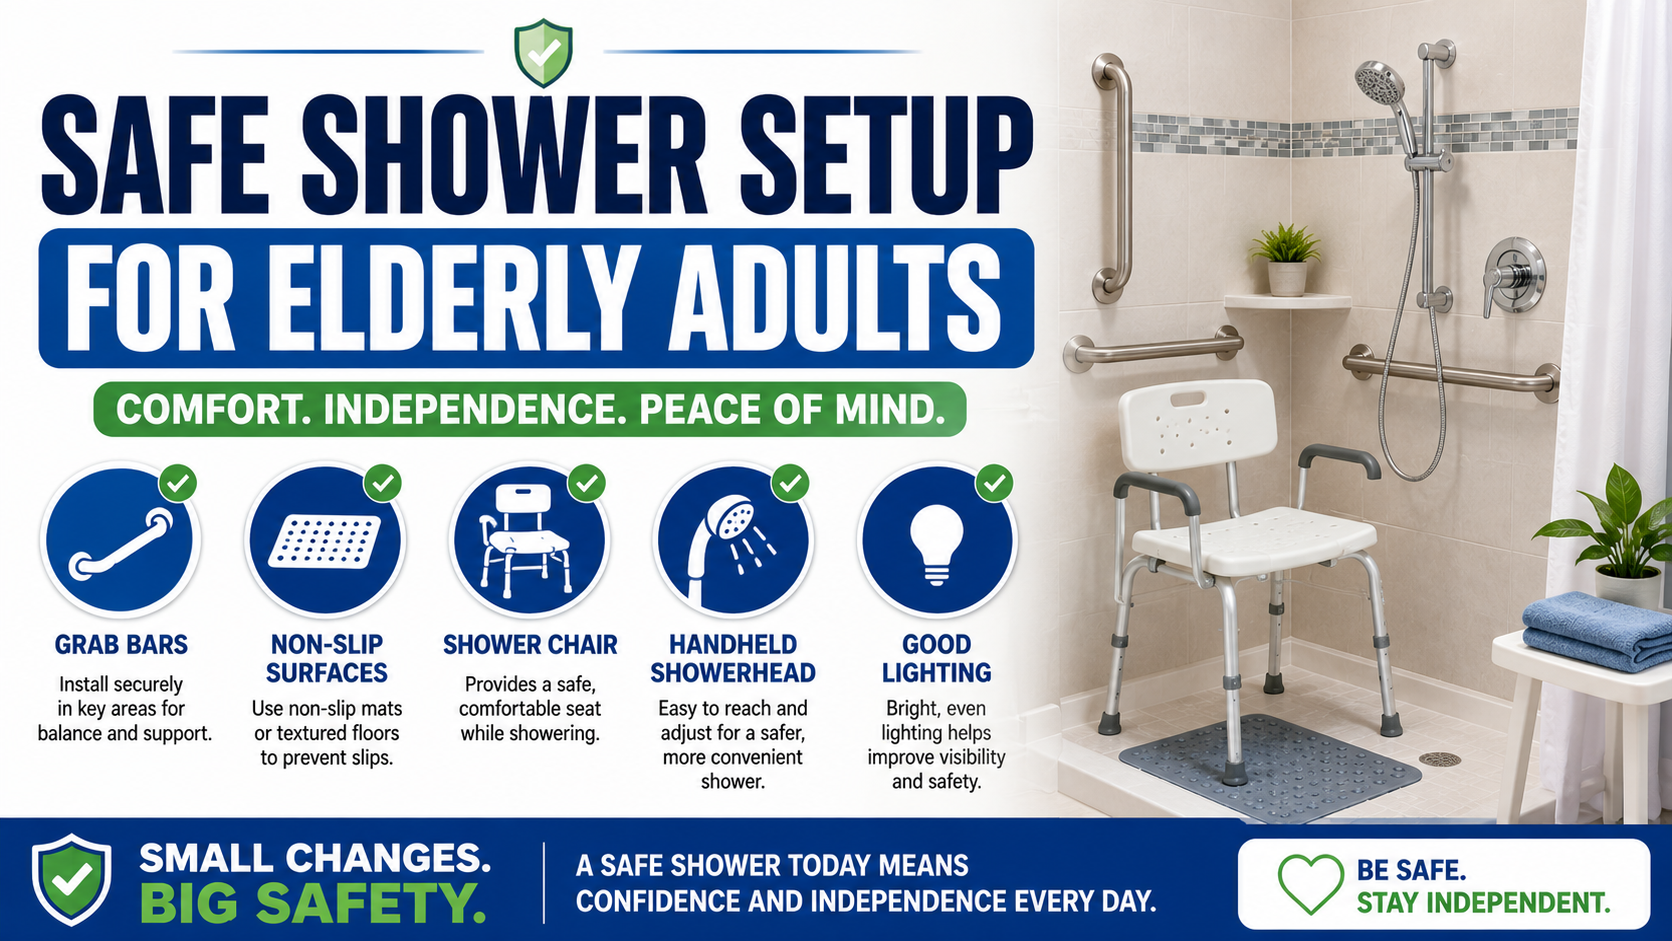
The Complete Safe Shower Setup — In Order of Priority
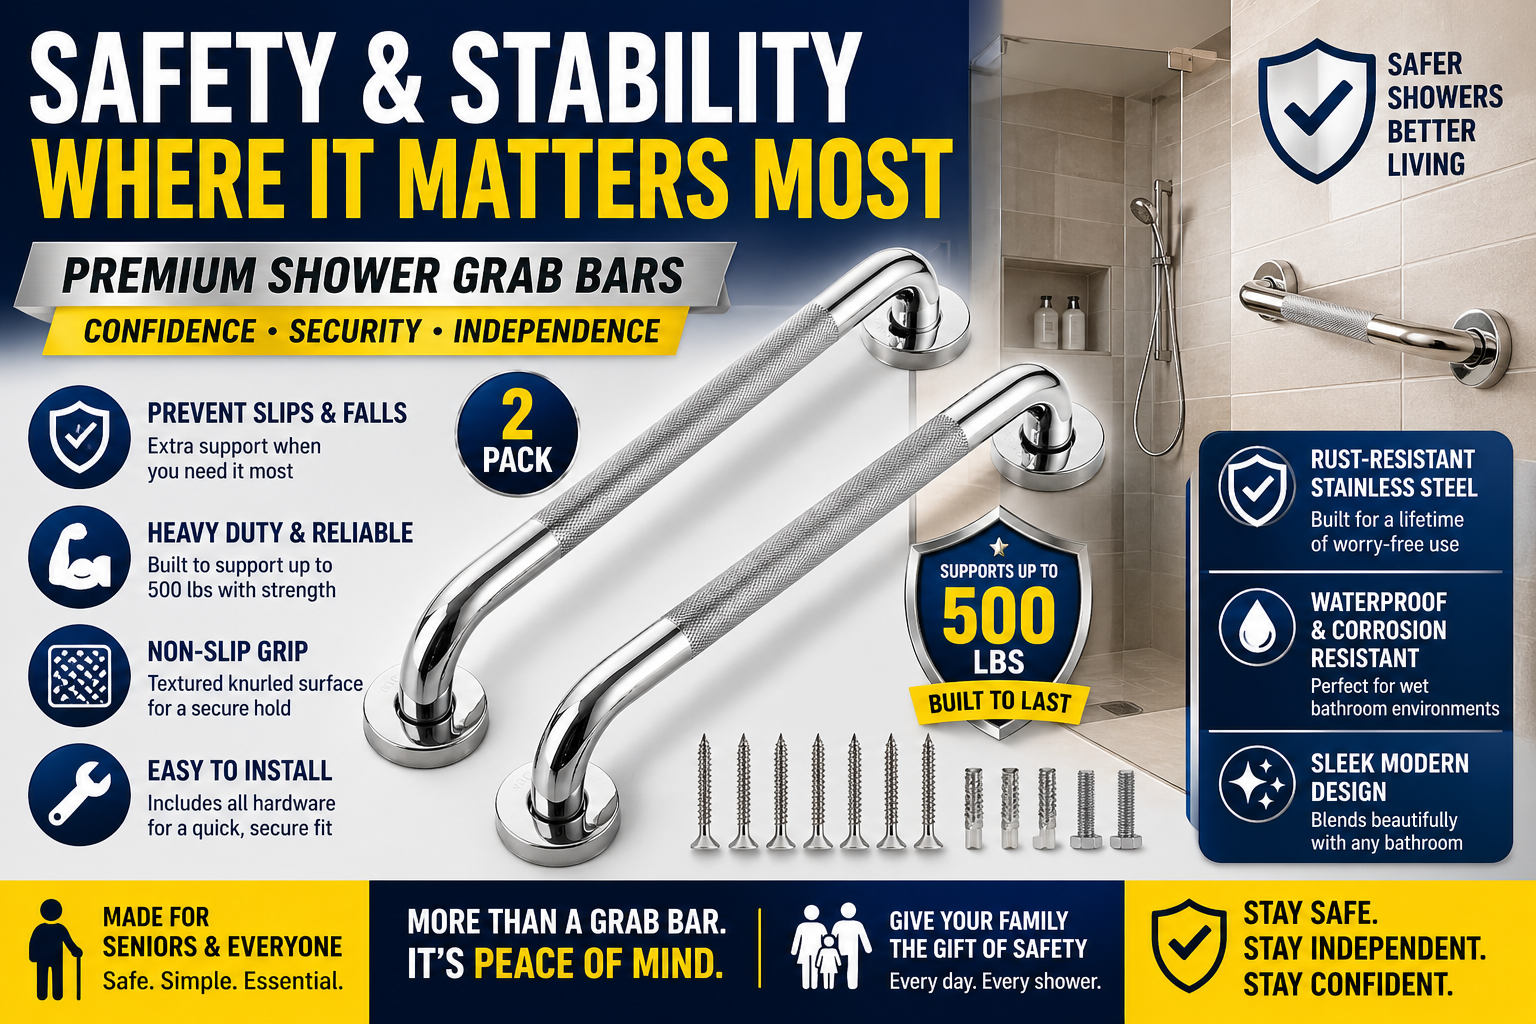
1. Grab Bar at the Shower Entry — The Most Important Modification
Nothing in shower safety comes close to the impact of a properly installed grab bar at the entry point. This single modification directly addresses the highest-risk moment — the transition in and out — and it does it permanently, for every shower for as long as the person lives in the home.
Position: On the wall at the shower entry, inside the shower space, at a height that allows gripping while stepping through — approximately 33 to 48 inches from the floor, oriented vertically or at 45 degrees. This allows gripping at multiple heights through the arc of the stepping motion.
The critical distinction that gets missed repeatedly: towel bars are not grab bars. They are not designed to support body weight and will pull out of the wall under load. Proper grab bars are load-rated safety fixtures — rated for 250 pounds or more — mounted into wall studs or with appropriate load-rated anchors.
Our review of the best grab bars for seniors covers exactly what to buy. Our grab bar placement guide covers every location with precise measurements.
→ Get the 2-Pack Stainless Steel Grab Bars on Amazon
2. Grab Bar on the Back Wall of the Shower
Once inside the shower a second bar on the back wall at hip height provides support during the showering itself — for reaching, bending, and any moment of instability during the standing portions of the shower routine.
Position: Horizontal, on the back wall of the shower at approximately 33 to 36 inches from the shower floor — hip to waist height when standing. Centered on where the person typically stands.
If the person uses a shower chair — which is the next item on this list — the back wall bar also assists with the sit-to-stand transition from the chair. Both uses are served by the same correctly-positioned bar.
The two-pack grab bar purchase covers both the entry bar and the back wall bar in one order — which is exactly why buying a two-pack is the practical approach rather than buying bars individually.
→ Get the Grab Bars on Amazon — covers both entry and back wall positions
3. Shower Chair — Eliminate Standing Risk Entirely
A shower chair is the modification that removes the entire category of standing-in-a-wet-shower risk. Instead of managing balance on a wet surface through the full duration of every shower, the person sits. The balance demands drop from significant to minimal.
This is one of the most resisted modifications — because it feels like admitting something significant — and one of the most impactful once adopted. Occupational therapists recommend shower chairs proactively, not reactively. The most effective framing: showering seated is genuinely more comfortable and less physically demanding. Many people who try it prefer it on comfort grounds alone regardless of safety.
What to look for: a 300+ pound weight capacity, non-slip rubber feet that grip the shower floor, adjustable height to match the user’s body, and a removable back for flexibility. Our review of the best shower chair for seniors covers the specific option we recommend.
→ Get the HOMLAND Shower Chair on Amazon
4. Non-Slip Surface Inside the Shower
Even with a shower chair in use, the shower floor needs non-slip treatment — for the moments of standing during entry and exit from the chair, and for anyone who uses the shower standing for any portion of the routine.
Two options work:
Non-slip adhesive strips applied directly to the shower floor — they don’t shift, don’t require maintenance, and provide consistent grip. Apply them to the areas where feet contact the floor most frequently.
Non-slip shower mat with suction cups — works on most shower floor surfaces but requires testing the suction cup performance on the specific surface before relying on it. Suction strength varies significantly by product and tile type. Check grip before use and periodically after installation.
5. Non-Slip Bath Mat Outside the Shower
The exit transition — stepping out of the shower onto the bathroom floor with wet feet — is where standard bath mats fail most dangerously. A mat that shifts under the first wet step creates a fall risk at exactly the moment when the person is most vulnerable — stepping from one surface to another with wet feet and the momentum of the step-out motion.
Standard fabric bath mats have three failure modes that matter: they shift under wet feet, they stay damp for hours creating ongoing wet surface risk, and their non-slip backing degrades over time. A diatomaceous earth stone bath mat solves all three simultaneously — it absorbs water almost instantly, stays completely in place under load, and maintains its performance indefinitely.
Our review of the best non-slip bath mat for seniors covers why most mats fail and what actually works instead.
→ Get the Diatomaceous Earth Stone Bath Mat on Amazon
6. Handheld Shower Head
A handheld shower head — one that detaches from its mount and can be directed while seated or standing — transforms the shower experience for anyone using a shower chair. Instead of positioning the body under a fixed spray, the spray comes to the person.
This allows thorough rinsing while seated without the awkward movements required under a fixed head. It also makes it easier for a caregiver to assist with showering when that becomes necessary. A handheld shower head is a relatively inexpensive addition — most install on the existing shower arm without tools — and provides immediate, significant practical value.
Look for a model with a long hose — at least 60 inches — a pause function that stops flow without turning off the water temperature setting, and a mount that holds the head at an accessible height for both seated and standing use.
7. Shower Caddy Within Reach
Reaching for shampoo, soap, and other products that are stored out of easy reach creates balance challenges during every shower. A shower caddy or shelf positioned so all products are within easy reach from both seated and standing positions — without requiring reaching overhead or bending to floor level — eliminates these routine reaching movements.
Tension-mounted corner caddies that don’t require drilling are available at most home improvement stores and install in minutes. Position at a height accessible from the shower chair seat — typically 36 to 48 inches from the floor — and ensure the products most frequently used are at the most accessible position.
8. Shower Lighting
The bathroom should never be completely dark when entering for a shower — particularly for early morning or nighttime showers. A night light in the bathroom ensures there’s always ambient light when entering, and that the main light switch is visible and reachable before navigating into a dark space.
For anyone who showers in the morning before full alertness, motion-activated bathroom lighting that turns on automatically when someone enters is worth considering — no switch to find, immediate illumination.
Our review of the best auto-on rechargeable lights covers the option that works as both a night light and emergency power outage light simultaneously.
→ Get the Energizer Auto-On 3-Pack on Amazon
9. Hot Water Temperature Setting
Set the water heater to 120°F or below. This is a five-minute modification that prevents scalding — a genuine risk for anyone with reduced temperature sensation from neuropathy, or cognitive changes that affect temperature judgment.
Standard water heaters are often set higher than necessary for shower use. Lowering the setting to 120°F provides adequately hot water for showering while eliminating the scalding risk at higher temperatures. This is particularly important for households managing any degree of diabetic neuropathy or dementia.
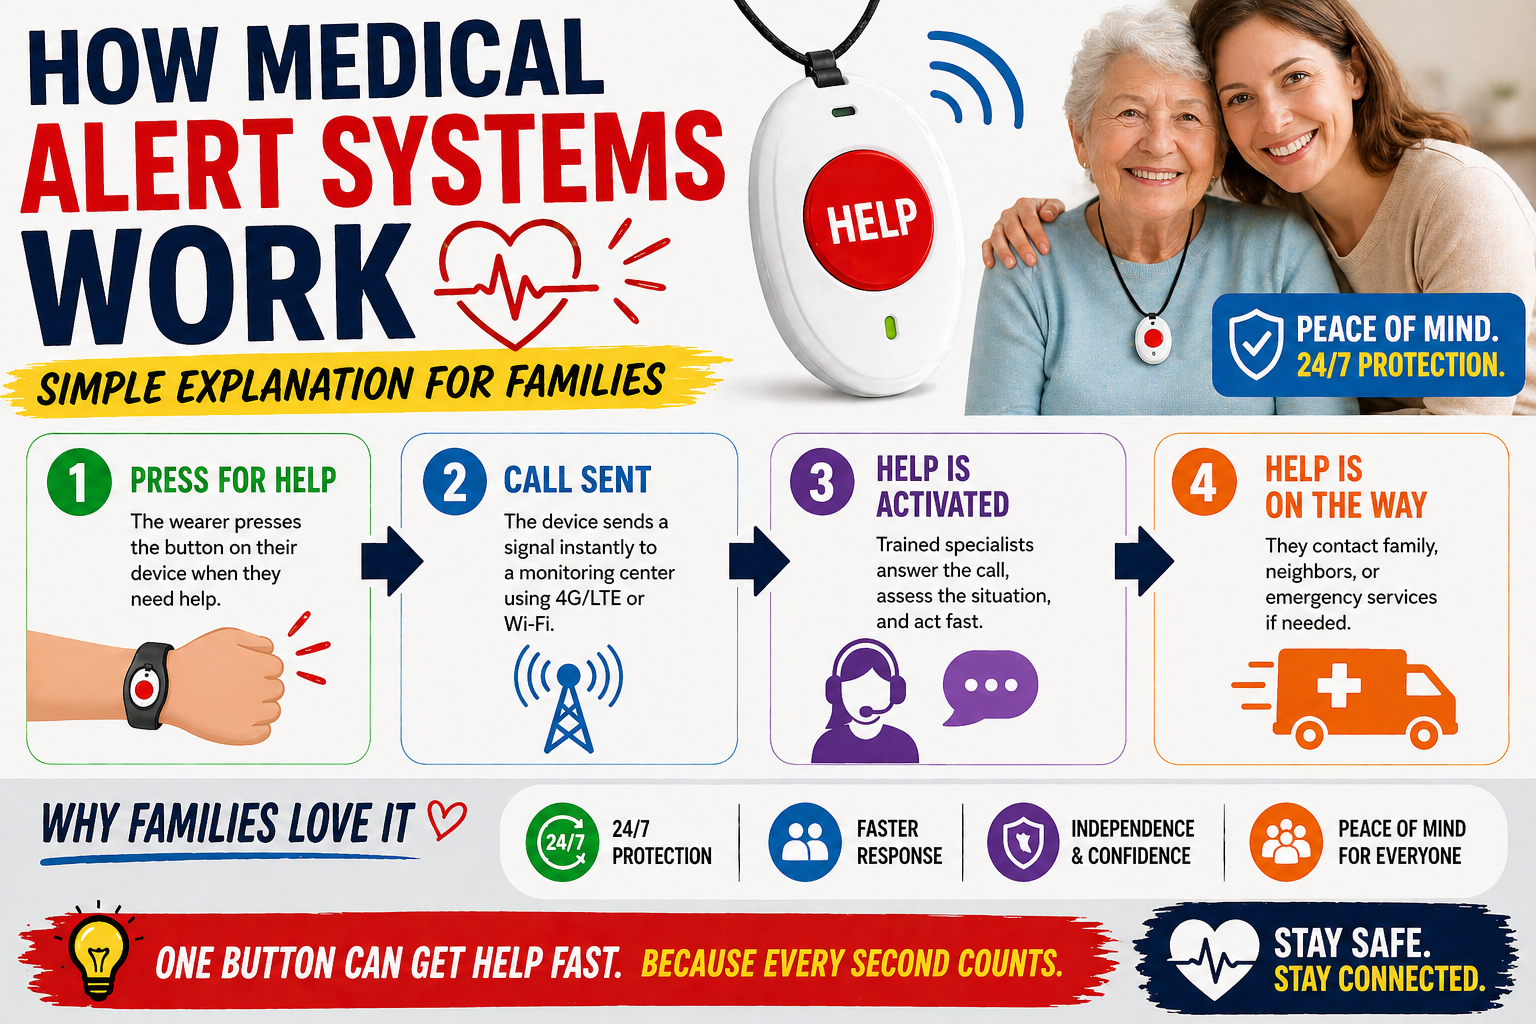
10. The Safety Net — Medical Alert Device
Even a thoroughly equipped shower with every modification on this list cannot guarantee a fall never happens. The bathroom will always carry some inherent risk. The question that needs an answer before it becomes urgent: if a fall occurs in the shower, what happens next?
A medical alert device worn on the wrist goes into the bathroom. Unlike a base unit in the living room — which can’t hear through a closed bathroom door — a wrist device is there during every shower, every bathroom trip, every moment when a fall could happen.
The SecuLife Smartwatch provides automatic fall detection that triggers an alert without requiring any action from the wearer — critical in a scenario where a fall leaves the person unable to press a button. It also provides GPS tracking and two-way calling. Our full SecuLife review covers everything worth knowing before deciding.
→ Get the SecuLife Smartwatch on Amazon


Walk-In Shower vs. Walk-In Bathtub — When to Consider the Bigger Upgrade
For most people the modifications above transform a standard shower into a genuinely safe showering environment. But for two specific situations a larger modification may be worth considering.
Eliminating the Threshold Entirely
Even with a grab bar at the entry, a shower threshold — the raised edge that must be stepped over — creates a step-over movement that becomes increasingly challenging as mobility declines. A curbless shower — flat entry, no threshold — eliminates this movement entirely. It’s a bathroom renovation project rather than a weekend modification, but for someone planning a bathroom update anyway it’s the right way to do it for long-term aging in place.
Walk-In Bathtub
For anyone who prefers soaking baths and finds standard tub entry genuinely unsafe — the 15 to 18-inch step-over height of a standard tub is one of the most demanding bathroom transitions available — a walk-in bathtub replaces the dangerous entry with a door that opens at floor level. Our review of the walk-in bathtub covers the FerdY Floridian option and everything worth knowing before making this investment.
Shower Safety Setup Checklist
Use this as your installation planning reference. Work through it in order — items at the top have the highest impact.
- ☐ Grab bar installed at shower entry — vertical or 45 degrees, 33 to 48 inches from floor
- ☐ Grab bar installed on shower back wall — horizontal, 33 to 36 inches from floor
- ☐ Shower chair in place with non-slip rubber feet
- ☐ Non-slip surface inside shower — adhesive strips or suction mat
- ☐ Non-slip bath mat outside shower that stays completely in place when wet
- ☐ Handheld shower head installed
- ☐ All shower products within reach — no overhead or floor-level reaching
- ☐ Night light in bathroom — auto-on preferred
- ☐ Water heater set to 120°F or below
- ☐ Medical alert device with fall detection in use — worn into bathroom


Getting a Resistant Person to Accept the Shower Chair
The shower chair is the most commonly resisted item on this list — and the most impactful one for daily safety. A few specific approaches work better than others.
Lead with comfort not safety. “This makes showering less tiring and more relaxing” is accurate and lands without triggering the defensiveness that safety framing creates. Many people find seated showering genuinely more pleasant and less physically demanding than standing — that experience is the best persuasion available.
Try it once without pressure. Ask them to use it once, when they’re not rushed, with you present. The physical experience of how much easier it is often does more persuasion work than any conversation.
Frame it as temporary if needed. “Just try it for a week” removes the permanence that makes it feel like a bigger concession than it is. Many people who start “temporarily” never go back.
For more on navigating these conversations our guide on how to talk to a parent about safety measures covers the principles that apply to every safety conversation.

The Shower in the Complete Bathroom Safety Picture
A safe shower setup is the highest-priority element of bathroom safety — but the bathroom has other high-risk areas that deserve attention alongside it.
Toilet safety rails address the multiple daily toilet transfer risks. Our review of the best toilet safety rails covers the specific option we recommend.
The complete bathroom safety picture — every modification worth making across the entire room — is covered in our guide on how to make a bathroom safer for seniors.
And for fall prevention beyond the bathroom our comprehensive guide on fall prevention tips at home covers every room with a complete checklist. Our guide on home modifications ranked by impact puts everything in priority order across the entire home.
Frequently Asked Questions
How much does a complete safe shower setup cost?
The core shower safety setup — grab bars, shower chair, non-slip mat inside and outside — typically costs $150 to $300 in products plus $100 to $150 for grab bar installation if hiring a handyman. The handheld shower head adds $30 to $80. The complete setup is achievable for under $500 in most cases — a modest investment given that it’s used every single day and directly prevents the serious falls that result in hospitalizations costing tens of thousands of dollars.
Can grab bars be installed on tile without cracking it?
Yes — with the right technique. A diamond-tipped tile bit at low drill speed prevents cracking during the initial hole. Mark locations precisely before drilling. Use masking tape over the drill point to prevent the bit from walking across the tile surface. If tile installation feels beyond your comfort level, a handyman with tile experience can complete it quickly and inexpensively.
Does a shower chair work in a small shower?
It depends on the specific shower dimensions and chair size. Measure the shower interior before purchasing a chair and compare against the chair’s footprint. Smaller transfer benches — which span the threshold rather than sitting entirely inside the shower — work in showers too small for a standard chair. Our review of the best shower chair covers dimensions and what to measure before buying.
Should the grab bar go inside or outside the shower?
The entry grab bar should be inside the shower space — positioned so the person grips it while stepping in and out. A bar outside the shower requires reaching across the threshold to grab it, which creates an awkward position at the moment of weight transfer. Inside the shower, at the entry point, is the correct position. Our grab bar placement guide covers this with precise measurements.
How often should shower safety equipment be checked and maintained?
Test grab bar stability every few months by applying firm downward and lateral pressure — any movement indicates the mounting needs attention before the bar is relied on. Check non-slip mat suction cup performance periodically. Replace the bath mat if it shows any tendency to shift. Check the shower chair leg hardware periodically for tightness. The equipment that daily life depends on is worth a five-minute quarterly check.


Set It Up This Weekend
A safe shower setup is one of the most impactful weekend projects available for senior home safety. The products ship within days. The grab bars take a few hours to install. The chair and mats are in place within minutes of arrival.
Every shower taken after the setup is complete is safer than every shower taken before it. That’s not an abstract benefit — it’s immediate, daily, compounding protection against one of the most common causes of serious injury in older adults.
Order the products. Schedule the installation. Get it done this weekend.
→ Get the Shower Chair on Amazon
→ Get the SecuLife Smartwatch on Amazon
About the Author
Carol Simmons is a Certified Aging-in-Place Specialist (CAPS) who spent 15 years completing home safety assessments across Florida and the Southeast. The shower and bathroom consistently rank as the highest-priority areas in every assessment she conducts — and the modifications in this guide are the ones she recommends most frequently because they make the most real-world difference. She writes for Elder Safety Guide to give people the practical, prioritized guidance they need to make their homes genuinely safer without wasting time or money on lower-impact changes.